Mounting options for enclosures can vary based on the specific needs of your project, the type of enclosure, and environmental factors, as well as accessibility, stability, and protection.
Below are some common mounting options and their key differences:
Standard Concrete Mounting Base
Durability, strength, and the ability to support heavy loads make concrete pads popular for enclosure bases. Additional benefits include providing a secure, level, durable, and watertight base.
Although more costly than other options, they often last more than 50 years when installed correctly and with adequate drainage. Concrete pads are resistant to shifting and cracking, a problem that often occurs with asphalt or gravel. Concrete pads are a reliable and long-lasting option for an enclosure base.
StrongBox Installation Instructions for Standard Concrete Base
Step 1: Find and remove the mounting template from the base. It is attached upside down for shipping purposes.
Step 2: Detach the template from the bottom of the enclosure by carefully removing and setting aside the stainless steel bolts, washers, and nuts. Reattach the bolts, washers, and nuts to the template in the same direction they were removed.
Step 3: After reassembling the bolts, nuts, and washers to the template, turn it upside down. The heads of the bolts should be on the bottom.
Step 4: Push the stainless-steel bolts into the wet concrete until the template rests lightly on the surface. The template should form a flat, smooth, and even surface to attach the enclosure.
Step 5: Remove and throw the template away after the concrete is completely dry. The bolts, washers, and nuts should be in the position to accept the enclosure. To ensure proper installation, the concrete’s surface must be clean, flat, and smooth. Do not attach the enclosure without first removing the template.
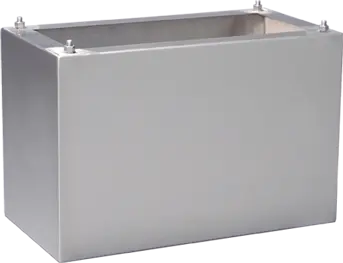
StrongBox Pedestal Riser Base
Pedestal risers are a durable and cost-effective way to bring enclosures higher up, so the enclosure and its contents are more easily reachable. This type of base also provides space for additional internal components. Pedestal risers can also be used to bring all boxes in an area to the same level for uniformity or aesthetics.

StrongBox Installation Instructions for Riser Pedestal
Steps 1-5: Follow the instructions above to attach the riser pedestal to the concrete pad. The bolts, washers, and nuts should be in position to accept the riser.
Step 6: Attach the enclosure to the riser with the included hardware and tighten from the inside with a socket wrench.
QuickPad™ Mounting Base
StrongBox QuickPad™ is an alternative to a concrete pad installation. With the QuickPad mounting pad and support base, you can quickly and easily install and mount your enclosure. No concrete is required, which means you skip the hassle of mixing, pouring, and waiting for it to dry. The lightweight construction makes it easy to handle and install.
The mounting pad’s unique fastening system makes it easy to securely attach the enclosure to the pad and the pad, in turn, to the support base. The heavy-duty pad, support base, and StrongBox® enclosure become a complete, secure unit that is stable and resistant to vandalism. It’s as simple as that — no muss, no fuss.
The buried support base provides additional stability and security for the entire assembly. All mounting hardware is made of stainless steel to prevent corrosion and rust. Plus, the QuickPad mounting base is available for all StrongBox enclosures.

StrongBox QuickPad Installation Instructions
Step 1: Dig a hole around the backflow pipes large enough to fit the support box with conduits underneath. The hole should be about 15 inches deep. The soil grade should be 2 inches below the top of the support box. Backfill and pack firmly around the outside of the support box.
Step 2: Line up the bolt holes in the reinforced pad with the support box in the ground. Place the bolts through the hole and tighten the nutplate from the inside with a socket wrench.
Step 3: Attach the enclosure to the reinforced pad and 3/8 by 3/4 inch stainless steel bolts. To minimize rodent and moisture issues, the support box should be filled halfway with pea gravel.
When deciding on the type of mounting base, it’s essential to weigh the pros and cons against the specific needs of your project, budget constraints, and environmental considerations. Contact us to learn more about the pros and cons of each mounting method.